Laravel provides a simple way to send email.
Configure Settings For Email :
Go to app/config/mail.php to configure the settings for sending emails. There are three different email drivers: smtp (default), PHP mail function and sendmail driver.Let’s start with mail driver.
‘driver’ = ‘smtp’,
Default driveris smtp, we need to change it to PHP mail funciton:
‘driver’ = ‘mail’.
from = array(‘address’ = null, ‘name’ = null),
Change to:
‘from’ = array(‘address’ = ‘app@awesomeapp.com’, ‘name’ = ‘Awesome Laravel 4’),
Save it. Now you should able to send emails using PHP built in mail driver!
Email With Gmails:
Have a gmail account, great !! you can use it to send email. Open your app/config/mail.php. This time use smtp driver:
<?php

return array(

    'driver' = 'smtp',

    'host' = 'smtp.gmail.com',

    'port' = 587,

    'from' = array('address' = 'app@awesomeapp.com', 'name' = 'Awesome Laravel 4'),

    'encryption' = 'tls',

    'username' = 'your gmail id',

    'password' = 'your gmail password',

    'sendmail' =  '/usr/sbin/sendmail -bs',

    'pretend' = false,
);
?>
Great job!
HTML Template:
Lets create data for emails. Use HTML template for emails. Laravel
has a folder for this purpose. Go to app/views/emails/auth/reminder.blade.php. Below is the content of the file.
<!DOCTYPE html>
<html lang="en-US">
<head>
<meta charset="utf-8">
</head>
<body>
<h2>Password Reset</h2>
<div>
Reset your password, complete this form: {{ URL::to('password/reset', array($token)) }}.
This link will expire in {{ Config::get('auth.reminder.expire', 120) }} minutes.</div>
</body>
</html>
Above is a password reset HTML email template, provided by Laravel. We are dealing with
contact emails, sl create a new template. Name it ContactEmail.blade.php, place it in app/view/emails folder. content:
<!DOCTYPE html>
<html lang="en-US">
<head>
<meta charset="utf-8">
</head>
<body>
<h2>Contact Form</h2>
<div>
Someone just contacted us:</div>
<div> Subject: {{ $subject }}</div>
<div> Message: {{ $emailmessage }}</div>
</body>
</html>
we create a basic HTML template, and then we use {{ $subject }} and {{ $emailmessage
}} to output mail subject and mail message.
First Email:
As soon as user submit the form, Laravel will check the form input, if validation satisfies, the template will be sent out to our email address. Lets back to our app/routes.php file and use Mail::send function to send emails:
Route::get('/contact', function()
{
return View::make('contact');
});

Route::post('contact', function()
{
$data1 = Input::all();
$rules = array(
'subject' => 'required',
'message' => 'required'
);
$validator = Validator::make($data1, $rules);
if($validator->fails()) {
return Redirect::to('contact')->withErrors($validator)->withInput();
}
$emailcontent = array (
'subject' => $data1['subject'],
'emailmessage' => $data1['message']
);
Mail::send('emails.contactemail', $emailcontent, function($message)
{
$message->to('arjita.mitra@yahoo.com','Learning Laravel Support')
->subject('Contact using Our Contact Form');
});

return 'Message sent!!';
});
In my last blog I already explained- ” How to create a blade template for contact page in laravel. ”
Please visit the link below-
Let me explain the above code for better understanding:
$emailcontent = array (
'subject' = $data1['subject'],
'emailmessage' = $data1['message']
);
We created an array called $emailcontent, array contains subject and emailmessage from the
form.
Mail::send('emails.contactemail', $emailcontent, function($message)
{
$message->to('arjita.mitra@yahoo.com','Learning Laravel Support')
->subject('Contact using Our Contact Form');
});
After that, we use Mail::send Laravel method to send mails. The first parameter is our con-
tactemail.blade.php and the emails folder where the file is located.
The second parameter is our mail content.
The third parameter is a function helps to send our email. you need to fill in where the mail will be sent to, name of the receiver and the subject of our email.
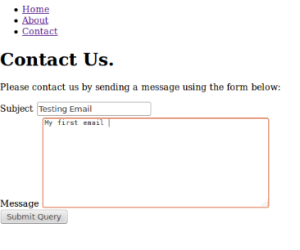
If everything goes ok, go to our contact page, fill in the contact form.
 After that hit the submit button, we will get the message “Your message has been sent”!
oow! Fantastic . Now, let’s check your email inbox. you should see:
- Laravel Connection could not be established with host smtp.gmail.com.
- Expected response code 250 but got code “535”, with message 535-5.7.8 Username and Password not accepted.
- Failed to authenticate on SMTP server with username “example@yahoo.com” using 2 possible authenticators.
one solution is to click the below link –
https://www.google.com/settings/security/lesssecureapps
click on enable and save it
Then try senidng email again.
It may work.
Hope this post was helpful.

